


Instructional Articles
Need some quick tips or looking to try a new trick? There are ten instructional articles available to view online or download for reference while in the boat. The topics covered are:
Toeside Front Roll and Scarecrow
The Toeside Front Roll, and Scarecrow are very similar to each other, if you learn one it will be very easy to learn the other. The Front Roll is no different to a perfect front flip that you would do on a trampoline, and on the Scarecrow, you just add a 180 to the end.
Prerequisite
Before attempting either of these tricks, you should master toeside wake jumps and toeside 180’s. You also should be able to land toeside 180’s with the handle close to your hips, and land them in the flats.
Edging In
Start about 20 feet away from the wake and edge like a normal toeside jump. The only difference is, as you begin to edge up the wake, stand tall and back off your edge immediately before throwing the trick. If you keep a hard edge through the top of the wake on these tricks, your board tends to stick to the wake and you won’t get any air.
Throwing the Front Roll
At the top of the wake, throw your head straight down toward the center of your board. Hold the handle with both hands as you throw the trick, and let go with your back hand as you come out of it.
Throwing the Scarecrow
At the top of the wake, throw your head and back shoulder down and toward your front foot to initiate the 180 rotation. Hold on with both hands through the entire trick. Half way through the rotation, pull the handle toward your hip that will be in front when you land to help rotate the 180.
Trouble shooting
Most people tend to bring the handle up or over their head when learning these tricks, which slows down the rotation and makes it hard to land. Concentrate on keeping the handle low and close to your hips.
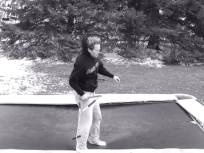
Whether throwing these tricks on a trampoline, or edging up the wake, they both start the same way.
Toeside Front Roll |
Scarecrow |
 |
 |
 |
 |
 |
 |
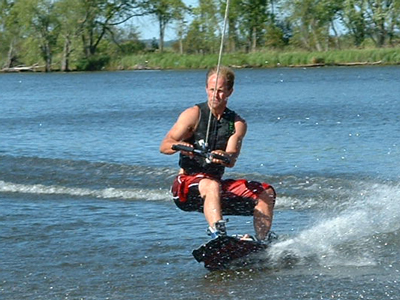
Wakesurfing
Surfing in The Midwest!
The first time I tried Wake surfing I was hooked. The feeling of riding without a rope, the slow boat speeds, and ability to surf in rough water makes the sport addictive for anyone.
Overview
Only wake surf on Inboard or V drive boats. Most people find the best wake at 9-11 MPH. Starting line length should be about 10 feet past the back platform of the boat. If you have Fat Sacs you'll want to heavily weight the port side of the boat (starboard for Nautiques) to get the best surfing lip. Typically you'll need at least one thousand pounds of weight in the boat to get a ride able surf wake.
Getting Started
The easiest way to get up on a wake surfer is to lie on your back in the water, and place your heels on the board wider than shoulder width apart. When you are set in this position, have the driver put the boat in gear. As you slowly are pulled through the water, simply press down on your heels and the board will be tipped under your feet and ready to ride. At this point getting up on the wake surfer is exactly the same as a wakeboard start.
Facing the Wake
With every boat, there is one side of the wake that will always have a better lip than the other side. The cleanness of the lip is determined by the rotation of the boat's propeller. Basically, for every boat except Nautiques the wake will be better on the Port side of the boat. What this means for wake surfing is that you may have to ride the board switch, or opposite foot forward, so that you can face the wake, as opposed to having your back to the wake. I think it's a lot easier to always be facing the wake because you can see when you're falling off the wake and make adjustments quicker. It really doesn't seem to hinder beginners if they have to learn to ride with their opposite foot forward.
Fundamentals
Wake surfing uses all the same techniques as surfing in the ocean.
To accelerate toward the boat, put more weight on your front foot, to slow down put more weight on the tail. Your stance should be very wide, more than shoulder width apart so you can easily rock back and forth on the board to stay on the right spot of the wave. While riding and still holding on to the handle, the first thing to practice is getting the feel of a "loose" rope. After you can ride for at least 20 seconds with the rope being slack, it's time to throw the handle in the boat and surf.
On the Wake
Getting the feel for how the wake pushes you along can be the trickiest part. Where most beginners go wrong is that they don't stay on top of the wake enough, and go off the side of the boat too far. Always keep pressure on the edge of the board to keep it on top of the wake. Lightly bouncing on your front foot, or milking the board, will quickly accelerate the board forward when you get back too far from the boat and start loosing the push of the wave. Another way to keep up with the wave is to paddle or slap the water back with your hand to gain speed. The learning curve is very fast in wake surfing, it's not uncommon to see new riders surf rope-free and slashing the wave after just a few times on the board.
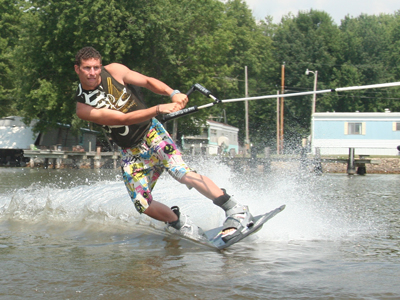
Wakeboard Driving 101
I think anyone who has ever wakeboarded has at some point been the victim of bad driving. Here are ten tips and reminders on some of the finer points of being behind the wheel.
1. Hold the throttle stick with your forefingers and thumb and keep your right elbow gently rested on the drivers pad. For those of you with out Perfect Pass, you should be able to hold the boat speed with in ½ MPH of the target speed.
2. Don't clinch the throttle stick in the palm of your hand. Keeping a tight closed fist grip on the stick doesn't allow good control to react to speed changes.
3. Your eyes should constantly be checking three things; your rider, the boat speed, and what's ahead of you. As a side note, I don't think it's good to have the radio blaring while driving, it generally hinders concentration toward your rider.
4. When driving for someone that has never wake boarded before, tie the rope really short off the tower, about 30-40 feet. At that length, there is so much vertical pull from the rope that it almost pulls the wake boarder straight up out of the water. Keep the speed below 15 MPH until they can ride for a minute or so. Once they can ride with the board pointed straight toward the boat, and look comfortable, go ahead and let the rope out to 60 feet.
5. Ease the rider out of the water with very little throttle. Wakeboard's have so much surface area, that it takes very little throttle to get out of the water.
6. Concentrate on driving straight lines. It's easy to get in the habit of following the shallow curves of the shoreline, but driving even a slight curve will cause one side of the wake to curl over and make it harder for your rider to have consistency on landing difficult moves.
7. Move passengers from one side of the boat to the other to make the wakes even. If one side of the wake is constantly curling over, more weight needs to be moved to that side of the boat to give both sides of the wake the same feel.
8. In heavy traffic, pull over to the side of the lake or river and drop your skier. I think you have to be proactive when someone is tailgating your skier, waving your arms and yelling usually doesn't get the attention of your average weekend Wally. Also, use the boat to block a fallen rider in the water.
9. Idle back to the downed rider, it's just as fast and doesn't create big rollers from a power turn.
10. Learn to throttle chop your rider. Whenever your wake boarder looks out of control in the air, pull back on the stick to put slack in the line. This technique will almost always save a hard fall, and is also very useful for teaching handle pass tricks.
BACK TO TOPMaintaining Longevity in Wakeboarding
I think everyone that has been riding for a few years will agree that wakeboarding can be hard on your joints, particularly your knees and ankles. When you look at Pro and Amateur riders who have had a long career in the sport, there are certain points to learn from their successes to protect and strengthen your own joints.
Stretch before you ride.
Although most people don't do this, it's the easiest way to avoid possible injury. Spend at least two minutes stretching; make sure to stretch your Hamstrings, Quads, Ankles, Shoulders, and Neck in your routine.
Protecting Knees
Many knee injuries are caused from having an improper stance or riding position on the board. I see a lot of wake boarders who ride with their front let straight, and their rear leg bent while they are riding around, and cutting into the wake. As they get into the air, they still have their front leg locked and tend to land that way, which increases the chances for knee injury. Try to get in the habit of riding with both knees bent all of the time. Besides protecting your knees, it will make the board more responsive by not riding tail heavy.
Protecting Ankles
Be aware of buying a board that is overly wide, as they tend to hyperextend your ankle on toe heavy or heel heavy landings. The wider the board is, the more leverage the outside edge has to hyperextend your ankle. I've personally had my ankle over extended a lot of times from wakeboarding. I now try to focus on keeping my ankles tense and locked into place as I leave the wake to try to avoid these types of injuries.
Absorb the Landings.
A lot of riders don't absorb the impact of landing properly, and will only slightly bend their knees upon landing. Others will keep their knees rigid, absorbing the shock with their lower back by breaking at the waist. Be sure to properly absorb the landing by going through a full range of motion with your knees, until your butt nearly touches the water, to preserve your ACL and knee cartilage, especially on big jumps. Inward movement of the knee on landings should also be avoided. Always try to land softly, think of the phrases "light as a feather", "straight as an arrow" to encourage proper body position.
Stance
A few years ago, it was fashionable in the pro wakeboard circles to have a stance width that was as wide as possible. After a while, these riders were having knee and hip problems. Your stance on the board is really something that is dependant on how your own knees work, and should be set up accordingly. The best way to do this is to have your board placed on the ground in front of you, and practice doing floor jumps directly behind it. Absorb some of the landings with your feet at shoulder width, and some with your feet wider than shoulder width apart. Position the width of the bindings on your board as a result of what feels most natural to you. The angle of the bindings should be set using the same method, most people find it comfortable to ride with both feet pointing outward, or duck footed, about 10 to 15 degrees.
Wake size
Avoid riding a huge wake all of the time, since it takes a toll on your body. Give your joints a rest from time to time by riding a smaller wake. It's also a good opportunity to learn things like backside 180's and spins, where a large wake isn't needed and can actually be a hindrance.
Off Season
In the off season, concentrate on exercises that build muscle around your knee and ankle to help support them. Physical therapists recommend weight room activities that build a balance of strength between the Hamstrings and Quads. Training activities like Leg Extensions, Leg curls, and jumping exercises have been shown to prevent undue stress on the ACL and the knee as a whole. Balance exercises such as the Indo board, build ankle strength, as well as toe and heel lifts, and outward and inward ankle rolls. Also, readily available joint strengthening vitamin supplements such as Glucosamine Chondroitin are recommended by sports medicine therapists to promote joint health and serve as a building block for cartilage and connective tissue.
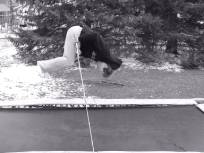
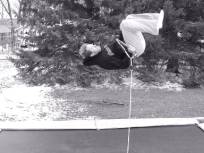
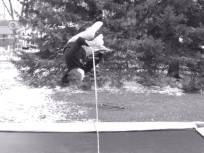
Trampoline Training
Trampoline training is the best cross training technique to help you progress faster in wakeboarding, and a great way to get a head start on the season. Any Pro wake boarder will testify that practicing on a trampoline will give you the aerial awareness, and muscle memory needed for learning new inverts and spins. Pro rider Tim Keepers says, "You should try a new trick one hundred times on the trampoline before you try it behind the boat." This approach to training will greatly reduce the learning and crashing time spent on each new trick.
There are a few safety points that you should keep in mind when you're jumping:
Here's how to bounce the right way:
BACK TO TOP
Crow Mobe
A Crow Mobe is a great way to get started in the world of mobes. A mobe is any trick where a flip is combined with a 360 spin. It may sound really difficult, but like any wakeboard move, take it one step at a time and you'll get it.
Prerequisites:
Before you attempt this, make sure you can land scarecrows every time you try them, it helps if you can land a scarecrow wake to wake and land them in the flats.
The Approach:
Your edge toward the wake is the most critical part of this move. Set up close to the wake, 10 to 15 feet out, and take a progressive cut, edging moderately hard through the top of the wake. Keep more of your weight on your front foot as you hit the wake.
In The Air:
For the first half of the trick, concentrate on keeping the handle low and hold on with both hands as long as possible. Half way through the flip, pull the handle in toward your front hip so you will have a little slack when making the handle pass. Delay the last 180 spin until right before you land. Concentrate on spinning the last 180 totally with your lower body, and let your shoulders follow.
The Landing:
As you land, there is a natural tendency is to slip back onto your heels, so push your chest forward as soon as your board hits the water. For learning purposes, try to land this trick wake to wake. It's quite a bit harder to stick this move if you are landing in the flats. Some people land this trick wrapped, however, I think it's more consistent to pass the handle immediately as you land.
These are the areas that most people have difficulties when trying Crow Mobes.
I'm can't figure out how to throw this trick.
The key to the Crow Mobe is waiting until the last second to rotate the second 180. Approach the wake just like you are going to do a scarecrow, and if you have time as you drop out of the crow, rotate the second 180 with your legs.
I don't have enough air to rotate the last 180.
Have your boat driver drive a slight arc in the same direction you are cutting. You want the wake to be curling over a little bit as you edge through it, giving you a more abrupt kick off the wake and more air.
I land on my board, but miss the handle every time.
This is another area where your driver can help out a little. Have the driver ease back on the throttle as you are about to land, which will create slack and make the handle pass easier. Also, make sure you pull the handle harder to your hip to create the needed slack.
I'm landing but slipping back onto my butt.
This happens a lot on boards that are designed to have a loose feel. You can either put slightly larger fins on your board, or, throw your upper body harder as you initiate the flip off the wake.
Tournament Tips
There is nothing to be nervous about, riding in tournaments is a lot of fun and will teach you what you need to practice to take your riding to the next level. An understanding of a few basic concepts can give you the competitive edge.
Preparing a trick pass
The standard tournament format is two-thirty second passes and one wildcard trick at the end of your second pass. When you're preparing your run, I think it's better to put your easier tricks at the beginning of the pass, so that you can adjust to the wake and towboat speed. Practice your passes with a stop watch in the boat to alleviate the feeling of being rushed, and not getting all of your planned tricks in at the tournament. Have your spotter time your pass; ideally you want to have all 5 or 6 tricks completed in 25 seconds. Consistency is the key tournaments, if you fall on a trick in practice, get up do that trick 3 times in a row.
How you are scored
The three areas that the judges will score your pass are: Difficulty of tricks landed, Intensity, and Variety of maneuvers. Try not to repeat any of your tricks, and go big. It can be difficult for the judges to decide who should win when everyone does similar tricks, but if you can do your stuff a little bigger than the next rider, you'll win. If you fall on a trick, chances are it was probably one of your harder moves, so show the judges that you can land it, and try it again.
Taking advantage of the course
Most tournaments will allow one out of course fall, so while the boat is getting set up to enter the course test the wake with a few jumps and let the driver know if the speed is alright. There will be a start buoy and an end buoy in the course. Make sure that you are set up outside the boat wake and ready to cut in as soon as you pass the start buoy. It's very common to see riders enter the course with out being ready, and then only being able to get two or three tricks in. If you stand up your pass and still have room in the course, stay busy and do some extra tricks to bump up your Variety score.
How to get involved
In the midwest we have several different series of tournaments that start in early May and continue through the end of August. The Midwest Mission to ride, American Wakeboard Association, National Wakeboard League, and Hyperlite all have grassroots events throughout the state. They are all great events and a great value. For more information check: mm2r.com, americanwakeboard.com!
Edging Techniques
One of the keys to becoming an advanced wake boarder is the ability to create the proper edge to the wake. There are 3 basic styles of edging that you should practice, and be able to call upon for different types of tricks.
Basic Progressive Edge
This is the type of edging style you should try to learn first, as a base for the other two.
The Technique:
Cut out wide, about 20-25 feet from the wake so you will be edging in on your heel side. Start your cut toward the wake by slowly drifting in from the line tension. Then gradually increase your pull against the boat, so that your hardest cut is through the top of the wake. Your cut should model the swing a pendulum, slow on the outside, then speeds up all the way to the center. Apply the progressive edge to these types of tricks: Backroll, Roll to Revert, Raley, Front Flips, Toe side Front and back rolls.
Non-Progressive Edge
In this style of edging, the goal is to be able to clear the wake, with out creating too much line tension. This is very useful when trying to learn any type of trick that requires a handle pass, such as a 360, an invert to blind, or off axis spins.
The Technique:
This is similar to the previous method in that you start your cut out wide, but differs in the last half of your edge toward the wake. As you approach the wake don't increase your pull, just try to ride over the wake without edging too hard through it. In most cases, you will want to land right on the downside of the wake.
Short Progressive Edge
This drill is useful for beginning riders trying to clear both wakes, as well as advanced wake boarders trying difficult moves, like a back mobe, that require extra vertical lift.
I try to teach this method to riders that are trying to clear both wakes, because it really forces them into the intimidating task of edging all the way through the top of the wake.
The Technique:
For beginners, the goal is to start as close to the wake as possible, while still being able to clear it. Start a progressive cut about 8' out from the wake, and try to clear both wakes. If you are successful, start moving in 1' closer on the following jumps. This drill will significantly raise your comfort level with edging though the top of the wake.
Practice these 3 techniques on both heel side and toeside jumps, and you will be able to learn new tricks faster and with fewer falls.
Trouble shooting
Face planting when you land?
When you get into the air, pull the handle into your hips. This way if you get off balance when you land your arms will be able to give some line tension back, and you won't get pulled forward.
Getting distance in your jumps, but not any height?
This is caused from two things. One is; flattening your board out as you approach the wake, or two; absorbing the wake with your knees. Keep your knees bent, but rigid and keep your board on edge through the wake.
Falling forward on toeside jumps?
Make sure when edging in toeside that you keep your chest up and your hips in front of you.
Coaching Fundamentals
Would you like to gain skills in training others, as well as your self, in learning how to progress quickly in wakeboarding? The focus of this article is on the process of learning and teaching a new trick. Discussed are four coaching concepts that will make you a better wakeboard coach.
Simplify Each Trick.
Examine each new trick that you would like to learn, and then break it down into simpler movements. For example, to learn a Heel side 2 wake 180, practice 1 wake 180's and ollie 180's to gain balance. Or when trying something harder like a Raley, make sure that you are first consistent at cutting hard at the wake and landing with two hands on the handle in the flats. Practice the simple aspects of the trick systematically and it will greatly reduce the overall learning process.
Make Driving Adjustments.
As the driver, you can make every bit of difference in the rider's ability to land a new trick.
Make the trick sound easy to overcome.
Most people just need the confidence to try something new. As the coach, you need to instill that confidence in them. Ninety percent of learning a new maneuver comes from a mental commitment. If you can take away a riders fear, their potential will be unlocked. As a related anecdote, whenever I try something new on the water, I tell myself this; Guys are doing back flips over 80 foot gaps on motorcycles. For me, that puts trying some type of flip several feet above the water into perspective.
Repetition
Repetition builds muscle memory. If you have access to a trampoline, practice on the trampoline as much as possible the tricks you would like to learn wakeboarding.
When you're out on the water, make it a point to train with repetition. I've always felt the best way to master a new trick is to try to do it 3 times in a row.
Trouble shooting
Having trouble getting yourself motivated to try a new trick?
BACK TO TOP
Learning the Air Raley
Whenever I suggest a student to try a Raley, the answer I typically get is "No way man!" It's not as hard to learn as you might think; there are 3 steps that will make learning this trick much easier.
Step 1
Before you try a Raley, your cut at the wake must be perfect. This step consists of practicing hard cuts at the wake and landing in the flat water with total control, basically a big wake jump. The key to the Raley is a strong progressive cut. That is, your cut toward the wake should start very light and then build gradually, so that your hardest cut is through the wake.
Start out wide about 25-30 feet from the wake and cut in with a strong progressive cut, make sure to edge all the way through the top of the wake.
In the air, keep your head up and both hands on the handle. Practice this step a lot, at least 25 times, before moving onto step 2.
Step 2
Take the same strong cut at the wake and let the board drift back slightly behind you while you're in the air. The key is get comfortable with gradually letting the board drift back a little bit at a time.
Make sure that you keep your head up and keep both hands on the handle so you will be able to pull the board back under your body. You'll know you're doing this right if you feel tension in your stomach muscles while you are in the air.
Step 3
This is the step where you throw the Raley back all the way.
At the camp, we've had success by making the rope very short, about 50 feet, and slowing the boat speed down about 13 MPH. The slower boat speed helps to take away the riders fear of trying the trick, while the shorter rope length make the wake steeper and gives an abrupt launch.
To avoid twisting in the air, make sure that you keep your eyes focused on the pylon of the boat.
As you edge up the wake bring your hips up toward the handle to help initiate the board to drift back. When you push the board back, keep your chest up and make sure your arms are fully extended. When you are fully laid out, you should feel a jerk or snap, pull the handle down to your knees as hard as you can. If you are butt checking on the landing, you're pulling it down too early. After you land this trick once, it is very easy to get it consistent.
Trouble shooting
Twisting over in the air?
Keep your eyes focused on your boat's pylon.
Doing a crooked or stargazed Raley?
Your front leg drifting back before your rear leg is off the wake causes this. Be patient. Make sure both feet are off the wake before you let the board drift back.
Doing a front flip crash out of the Raley?
As you get extended, keep your chest up, and don't let go of the handle, pull it back to your knees.
Seems too scary to try?
Keep practicing step one, then slow the boat speed down; you'll eventually get it.
Is a Bigger Wake Better?
A few months ago I rode the biggest wake of my life. It was a fully weighted down Nautique 230, with about 10 people in the boat along for the ride. I had a great time behind the boat, and stayed along to watch others take their turn. A few of the next riders were beginner to intermediate’s, and I noticed they had a pretty difficult time landing the tricks they would normally land on a smaller wake. This made me think about the misconception in wakeboarding that a bigger wake is always going to be better.
I’ve always thought that new riders who start out wakeboarding on a small wake have a huge advantage, because they are forced to learn how to edge and pop properly if they want to get any air at all. There are two bad habits that a big wake will typically create with novice riders; they will back off their edge as they hit the bottom of the wake, and absorb the pop with their knees.
A huge wake will also hinder the progression of new riders. I know this sounds a little cliché, but the bigger the wake the bigger the fall. After a few hard falls, fear starts to get in the way, and pushes riders out of the mindset of working on a trick until they land it. A un-weighted boat, or small wake, is not only better for learning the basics of edging and pop, but also for spins like front side and back side 180’s, and 360’s because it teaches you how to initiate the spin by pulling the handle toward your hips, and not hucking your upper body.
You may ride behind a fishing boat, or inboard/outboard, but don’t let that get you discouraged from progressing. Keep working on the basics of wakeboarding: progressive edging, switch riding, board grabs, toeside airs, and 180’s. Remember when wakeboarding was in its infancy? Pro riders were still landing mobes and Raley’s off 19 foot ski boats, with no extra ballast, and on the low pylon. Keep your rope length in mind too. You’ll want to ride a shorter length rope when you’re on a small wake, typically 55-60 feet so it’s easier to clear both wakes. When you ride a bigger wake, let the line out longer.
When you get to the skill level where you need to add weight to your boat, the general rule is to weight the front with half as much weight as the rear. For example, if you have 600 lbs in the rear of the boat, you’ll want to put 300 lbs in the front. To adjust the shape of the wake, more weight in the rear of the boat will make the wake steeper, while more weight in the front will make it rampy. Many riders commonly make the mistake of only weighting the rear of the boat. While this makes the wake big, it will also make it wash out and curl over at slower speeds.
At camp we start adding factory ballast, about 1000 lbs, when riders start working on basic inverts. We’ll add more weight with Fat Sacs when they get to the level of trying drifting tricks, inverts to blind, and rodeo flips. Until then, take that extra gas money you would have spent pushing a jacked up wake, and ride one more set on a smaller wake.
BACK TO TOPToeside Backroll & TS Roll-to-Revert
The Toeside Back roll, and TS Roll to Revert are two more tricks that are very similar to each other, if you learn the TS Back Roll, it will be very easy to take it to revert. The TS Back roll is no different than a perfect back flip that you would do on a trampoline, and on the TS Roll to Revert, you simply hold on with both hands through the flip and the 180 part of the trick rotates with little effort.
Prerequisite:
Before attempting these tricks, make sure that you’re comfortable with Toeside wake to wake jumps, and TS 180’s, and practice landing some basic Toeside airs in the flats. Also, if you’ve ever landed a Heelside Tantrum, it will make learning these tricks a lot easier since, like a Tantrum, you’ll basically throw a back flip off the top of the wake.
Edging In:
1. The approach is the same on both; Go out wider than normal, and take a drifting approach to the wake.
2. Try not to use too much of a strong progressive edge through the wake since it tends to make you throw these tricks early.
3. The key to learning these inverts quickly all depends on keeping the right posture in your upper body. Focus on keeping your hips up and in front of your body, and your chest up as you edge up the wake, if your chest gets hunched over you’ll have trouble getting enough air to clear the wake and under rotate the flip.
4. You have to stand taller on the approach of this trick compared to any other invert.
Throwing the Toeside Backroll:
Initiate this trick the same way you would do a back flip on the trampoline. At the top of the wake throw your head back, and let your hips come up and over. Hold on with two hands off the wake. As you start to come out of the flip, let go with your back hand and keep the handle low and close to your body with your front hand. If you’ve landed this trick ten times or so, you’re ready to try taking it to revert.
Throwing the TS Roll-to-Revert:
At the top of the wake, throw this trick exactly the same as the TS Back roll. As you start to come out of the trick, hold on with both hands this time and bring the handle across your body to your rear hip. Most people are surprised at how easy it is to get this trick to go to revert. Also, most riders will have a tendency to land this trick with the handle out and high, which makes landing pretty tough, concentrate on keeping that handle low and close. Some riders will also have trouble with landing hard and butt checking, it’s usually caused from not rotating the 180 part of the trick enough.
Whether throwing these tricks on a trampoline, or behind the boat, they both start the same way. I ride right foot forward, so that’s the way I’m doing them here on the trampoline.
BACK TO TOPHeelside Front Flip & Front-to-Fakie
A lot of riders overlook learning Front flips, but they’re not as awkward as you think, and they’re sure to get a head nod from people that are in the know.
Throwing the Front Flip:
The rotation should be similar to a cartwheel, end over end. I’m doing this on the trampoline, and I ride right foot forward.
1. At the top of the wake, throw your head and lead shoulder toward the tip of the board.
2. Keep the handle low, and near your front hip.
3. If your nervous about trying your first one, have your driver slow the boat down by One to Two MPH.
4. Keep your elbows up when you land to avoid the dreaded elbow to thigh Charlie horse.
5. You can see the water as you come out of this trick, which always makes landings easier.
Throwing the Front-to-Fakie:
When you are confident with doing Heelside Fronts, it’s time to take it to Fakie. Take the same approach, but let go with your leading hand when you initiate this trick off the wake. Also, at the top of the wake, push your rear shoulder toward the boat to put the 180 spin into it.
Trouble Shooting
Doing a Frantrum, a Tantrum Front-Flip Mix?
This is generally caused by the way you initiate the trick off the wake. Concentrate on keeping your trailing shoulder square and pushed forward toward the boat.
Also, when people do a Tantrum they typically will bring the handle up as they let go with their trailing hand. So when they go for a Front Flip they have the same natural tendency, which turns it into an ugly Frantrum. Keep the handle low, near your front hip, and hold on with both hands all the way through the trick.
Butt Checking on the Front-to-Fakie
This is caused from not rotating the 180 enough. Push the handle behind your front hip as you come down to help with the 180 rotation. Avoid the tendency to throw the trick early off the wake, try to take it straight up.
Breaking Through a Plateau
Unfortunately progression doesn’t always come easy in wakeboarding. Like most sports, the learning curve is really fast at first, and starts flattening out over time. If your skill level is stuck on a plateau, there are some simple drills and habits that will help you break through and progress year after year.
Avoid the bad habit of doing every trick in your same old routine before trying anything new. While there is a balance between Consistency vs. Learning, I’ve seen so many riders who are reluctant to try a new trick until they first go out and land every other trick they already have in their bag. By the time they do all this, they are typically getting tired out and don’t have much energy to work on something new.
Set your goals high, but don’t overlook the building block tricks in wakeboarding. For instance, most riders want to learn a Backroll, but skip learning 180’s, toeside airs, or backside spins.
Think of 5 tricks you would like to learn, and start working toward that goal each set. Take baby steps toward landing your goal trick, for example, if you want to learn a wake to wake Heel Side 180, make sure that you practice Ollie 180’s, Butter Slide 180’s, and 1 Wake 180’s first.
Ride more. For me, taking one set when I wakeboard will maintain my level of riding, but taking two sets each time I go will get me to progress. While some wakeboarders are blessed with a natural talent, the rider who is persistent will excel in the long run.
Don’t over-try one trick. While it’s good to buckle down on trying something new, don’t just work on that same trick your entire set. Just try it 5 times each time you ride, and move on. I’ve seen a lot of riders, especially on learning their first invert, start to get close to landing and try the trick over twenty times each and every time they go out. Fatigue always sets in preventing them from landing their goal trick, and their riding starts to suffer in other areas from being too focused on one thing.
Ride with a coach, or at least someone that is better than you. A good coach will quickly be able to see what drills you need to work on, and help you break habits that are standing in the way of learning. And just riding or watching people that are better than you will get you motivated to go out and try the tricks they are doing.
Ride in a Tournament. When you’re entered in a tournament, you’ll typically ride more in preparation for the event and build consistency. After the event, you’ll be excited to try new moves that others in your division were doing. Check out www.midwestwakeboarder.com for chat boards on getting together with other riders in your area, and info on local tournaments this summer.
BACK TO TOPHow to Get Sponsored
So you want to get sponsored for wakeboarding? You want to get free boards, boats, and be able to do the sport you love everyday? Getting sponsored isn’t too complicated; it just takes a lot of drive, determination, salesmanship, and time on the water. Here are some ways to make it happen.
Ride Smart
The first thing your going to have to do, is ride a lot, and push yourself to learn each and every time you ride. One set a day isn’t going to cut it, you’re gonna have to ride 2-3 sets a day to break into the pro level. Competitiveness always serves as a catalyst for progression; find other good riders in your area so you can push each other. Most importantly, while it’s good to be satisfied when you learn a new trick, don’t grow complacent. You’ll have to consistently drive yourself to learn new tricks, it also helps a lot if you find a coach who can help you break through plateaus in your riding.
Compete
Ride in as many tournaments as you can, and always keep a humble and positive attitude, even when you don’t ride well. Be polite; thank the event organizers for putting on the tournament, simple things like that will help you stand out in their mind.
Keep it Real
Be careful that you don’t get too caught up in the hype, I’ve seen a lot of wakeboarders who seem to care more about the business of getting a sponsor, than the actual purpose of wakeboarding. While the goal of getting sponsored is a good thing, don’t ever let that goal get in the way of riding for your own enjoyment.
Contribute
Get in tight with a local pro shop. They have relationships with company reps and have the connections to get you hooked up. Help your local shop by bringing in customers to buy from them, and volunteer at their in house events and at boat shows. If they can see that you’re committed to their shop, they’ll be more than happy to make some phone calls to factory reps about getting you an entry level sponsorship.
Marketing
If you don’t have a local marina to work with, make a video of your riding to send out to companies. Put your video on U Tube, and build a resume to send out, or post on sponsorhouse.com. Before you send your video out to a company check their website first for information on applying for sponsorship. Research which companies appear to be a good candidate to sponsor you, in most cases it’s good to look at smaller companies for entry level sponsorship.
Salesmanship
Remember that this is ultimately a business relationship. While you have to be an excellent rider to get your foot in the door, in most cases your sponsor will ultimately care more about the ways you will drive increased sales to their business, over what tricks you can throw down. You have to be a good salesperson to keep this relationship alive, so keep in close touch with your sponsors on what you’ve been up to, ways your helping improve their sales, how your marketing their company, and ideas for new or improved product for next year. Remember to be courteous, always send them a Thank You letter when they ship you product.
Wakeboard Posture
Posture is everything when it comes to effectively edging into the wake.
Heelside
Hips: The position of your hips is the key factor for creating leverage when edging toward the wake. Keep your hips up and in front of your shoulders.
Bad habit: Hips drift back behind the shoulders, and the board softly edges at the wake by the fins holding the direction, instead of the entire Heelside edge.
Shoulders: Keep your shoulders back and behind your hips for leverage against the pull of the boat.
Knees: Bend your knees as you start edging toward the wake. As you edge up the wake, straighten your knees up and push off the top of the wake. Bad habit: Knees stay bent while edging through the wake and absorb the pop on take off. On landing the knees stay stiff and don’t absorb the shock of landing.
Elbows: Should be bent at 90 degrees with the handle low and close to your hips as you begin edging toward the wake. Bad habit: Elbows straight, which leads to forward falls on landing.
Hands: Keep your hands close together when gripping the handle on Heelside and Toeside. This provides a more responsive pull when doing handle pass tricks. When you grip by the handle ends, the handle will slacken on handle passes which hinders consistency. Also, grip the handle with both palms down.
Toeside
Hips: Hips should be up and in front of shoulders when edging toward the wake. Bad habit: Hips are low and butt is sticking out. While this posture will in fact create good leverage edging toward the wake, it will always lead to forward falls on landing.
Shoulders: Should be up and directly over your knees. Bad Habit: Shoulders and chest drop down into a hunched over position when edging toward the wake.
Knees: Slightly bent and rigid while edging toward the wake. As you edge up the wake straighten your knees to push of the top of the wake.
Elbows: Bring your elbows in close to your body for the approach to the wake. I always teach students to hold on with both hands the entire way through the air on the toeside jump. It feels awkward at first, but this technique will force you to keep the handle close to your hips and make clearing the wake much easier.
BACK TO TOP
Heelside Backroll
A heelside backroll is typically the first invert we will teach at camp, and is a right of passage for moving into the world of inverts. This trick is basically a side flip, or cartwheel type motion.
Prerequisites
When I learned this trick the hardest part for me was taking the exact same approach to the wake on every attempt. You will want to land on the exact same spot of the wake each time; right on the downslope of the second wake. I think it helps to have heelside wake-to-wake 180s dialed in before attempting inverts because they help teach edge control towards the wake. Also, if you can spend a little time on the trampoline it will make your first couple of attempts much easier on the water.
For the Driver
Slow the boat down 2-3 MPH from normal boat speed. A big mushy wake will force the rider to edge all the way to the top of the wake before throwing the trick, and the slower speed will take away some of the fear of trying something new. On the first few attempts by the rider, just concentrate on initiating the trick correctly off the wake and landing in the water of both wakes.
The Approach
After trying a couple of slow speed attempts, bring the boat back up to normal speed and go for the trick wake-to-wake. Use a normal heelside wake-to-wake cut. It's very common for people to throw this trick early, or before they are off the wake, so concentrate on edging all the way to the top of the wake before throwing the backroll.
In The Air
Keep your head looking toward the boat, and throw your head and rear shoulder toward the tail of your board while pushing your hips toward the tip of your board. Keep the handle low and close to your hips throughout the rotation. Most people have a tendency to bring the handle up toward their head, which slows the rotation down. Halfway through the rotation, pull the handle closer to your hips. This will do two things, speed up the rotation to help you land on your board, and give you correct body position when landing, making it easier to give line tension back to the boat.
Trouble Shooting
These are the areas most people have difficulties when learning backrolls.
I'm under rotating this trick. There are generally two mistakes that will cause this:
Throwing the trick too early.
Solution: Practice some more slow speed one wake attempts where you begin to make the complete flip rotation and land in the middle of the wake.
Bringing the handle up towards your face.
Solution: Push the handle toward your hips after you initiate the flip.
The handle pulls out of my hand when I land.
Solution: This is caused a lot of times by the bad habit of letting go with your rear hand in the air. Hold on with both hands and pull the handle in halfway through the flip. You can also have your driver cut back on the throttle the first few times you land this trick.